Why I'm inflicting yet another Bootstrap 3 Pelican theme on the world.
So I kind of accidentally made a Pelican theme.
Didn’t mean to. Really I didn’t.
At least, I honestly had no intention of engaging in this kind of geekiness when I started this blog.
I just wanted to write a blog. A geek blog. I set out with every intention of ignoring the blogging technology and resisting any urges to tinker with themes (or anything else) and just write.
I failed.
I just couldn’t resist.
A little change here. Then a little change there. And pretty soon I had this monstrosity of a Bootstrap based Pelican theme on my hands.
Yes, another Bootstrap theme. Because what the world really needs is more websites with the now ubiquitous Bootstrap look. But in my defence I have tried to make this theme as easily customisable as possible. Which is the purpose of this blog post: to justify the existence of yet another Bootstrap blog theme, by demonstrating how (hopefully) easy it is to use the VoidyBootstrap theme to make a website with Pelican that doesn’t obviously look like a Bootstrap website.
I feel I can’t just unleash this (somewhat idiosyncratic) theme without at least attempting to justify its existence (and idiosyncrasies). So here goes.
When I started using Pelican for this blog, despite my limited design skills, I managed to hack together a custom theme that made use of Bootstrap 2 and Font Awesome 3. When I decided the time had come to upgrade the theme for Bootstrap 3 and Font Awesome 4, I took a step back first to evaluate how I wanted to proceed.
I used the break of backward compatibility that Bootstrap 3 presented as an opportunity to rethink my design and approach. (And I use the word “design” in this context very loosely.) Upgrading the theme for Bootstrap 3 necessitated somewhat of a redesign (or at least a bit of work), so I decided if I’m going to do this, I only want to do have to do it once.
If I were to use the combination of Pelican and Bootstrap to create other websites, I didn’t want to have to start from scratch.
Of course, there’s always the option of doing what seems be the standard practice for creating a custom website with Pelican: looking through the official themes repository, selecting a theme with a design that’s closest to what you want to achieve, then hacking away with wild abandon at the theme’s Jinja templates and CSS to implement the desired results.
Which is all well and good: Pelican is a technical tool for a technical audience who often have the skill and desire to do just that. But while there are a lot more themes available now than when I started playing with Pelican, few seem to be designed with customisation in mind.
I thought it might be worthwhile to create a very basic Bootstrap theme, with minimal additional styling, that would act as a reasonable starting point for a Bootstrap website with Pelican that could be easily customised — so that it doesn’t obviously look like a Bootstrap website!
The result is VoidyBootstrap. It’s intended more as a “meta-theme” than a stand alone theme (although it can certainly be used as a stand alone theme, and should work fine without any customising). It’s a basic blog theme based on Bootstrap — but one that (hopefully) facilitates customisation as painlessly as possible.
UPDATE, November 2014: This post is about version 1 of the VoidyBootstrap theme. It’s been reworked a bit since then, and many of the configuration settings changed. See the theme’s latest README file and changelog for details.
UPDATE, June 2015: While the concepts in the following sections are still mostly relevant, the details have changed. In version 2 of VoidyBootstrap, many of the configuration settings described below have been renamed. There is a summary of the major changes in this post.
VoidyBootstrap Quickstart
While the main goal of VoidyBootstrap is easy customisation, I also wanted to make things as easy as possible for those who just want a simple blog theme and don’t want to mess around with theme modifications. So for anyone happy with a fairly stock standard default Bootstrap look (at least initially), the VoidyBootstrap theme gives you that with a minimum of effort (hopefully).
The theme should work without any theme-specific options configured (I think). But as a bare minimum, you’d probably want to configure the following theme-specific settings in your pelicanconf.py:
SITENAME = 'mywebsitename'
SITESUBTITLE = 'Sub-title that goes underneath site name in jumbotron.'

# Extra stylesheets, for bootstrap overrides or additional styling.
STYLESHEETS = ("pygment.css", "voidybootstrap.css",)

# Use the default sharing button implementation.
CUSTOM_ARTICLE_SHARING = "sharing.html"
CUSTOM_ARTICLE_SCRIPTS = "sharing_scripts.html"
The following settings from the default Pelican theme are supported:
- SITEURL
- FEED_DOMAIN
- FEED_ALL_ATOM
- FEED_ALL_RSS
- DISQUS_SITENAME
- GOOGLE_ANALYTICS
Configure those that you require (usually in publishconf.py).
(See the theme’s README for a more detailed configuration example.)
And that’s pretty much it. With that you get a blog layout that looks something like this:
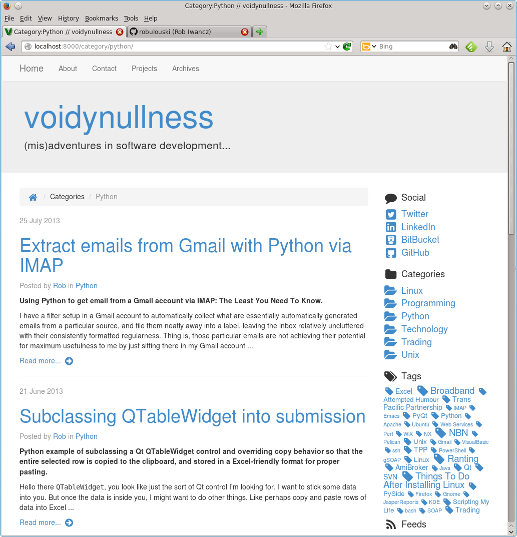
What’s provided by default is a responsive 2 column layout that stacks vertically on small screens. There is a navbar and Jumbotron at the top, and the sidebar contains category links and a tag cloud.
Customising Styles
You may notice the theme’s static/css directory is relatively bare. This is intentional. By default, all the CSS and Javascript files required by the theme (Bootstrap, Font Awesome, JQuery, etc) are downloaded from CDNs.
So by default the only styling provided by this theme is from a standard bootstrap.min.css downloaded via a CDN. And nothing else — no CSS files from the theme’s static/css directory are used, unless configured otherwise (which I’ll explain in a moment).
VoidyBootstrap provides two ways to customise the theme’s unashamedly default Bootstrap look (without having to resort to hacking at the supplied templates or CSS files). These methods can be used individually or in conjunction with each other.
The first is the STYLESHEETS setting. This is an array for specifying any additional stylesheet files. As mentioned above, by default the theme grabs what it need from CDNs and doesn’t reference any CSS files in static/css. The STYLESHEETS setting is provided to enable any additional (local) CSS files to be explicitly configured. It should be set to a list of CSS files present in the theme’s static/css directory.
All the CSS files in the STYLESHEETS array will be referenced by the theme’s base.html template after the main Bootstrap CSS file, so this provides a way to override the default Bootstrap styles. Therefore a simple way to provide your own styling on top of this theme is to add your own CSS files to the static/css directory, and add their filenames to the STYLESHEETS array in pelicanconf.py.
The theme’s static/css directory contains a sample CSS file (voidybootstrap.css), which can be used as a starting point. It provides a minimal set of styling (mostly just spacing and whitespace changes).
Of course, because STYLESHEETS is an array, any number of CSS files can be included, and it can be used to bring in any additional custom styling (not just Bootstrap overrides).
The second method of customising the theme’s default look is the MAIN_LOCAL_STYLESHEET setting. This configuration option allows the standard Bootstrap CSS file to be replaced with a customised one. It’s provided to make it easy to do things like integrate a customised Bootstrap file generated by the Bootstrap customizer, or one built using an advanced Less workflow.
Simply place the customised Bootstrap CSS file in the theme’s static/css directory, and in pelicanconf.py set MAIN_LOCAL_STYLESHEET to the filename.
(If the MAIN_LOCAL_STYLESHEET option is not set, the standard bootstrap.min.css will be used — from a CDN — as described above.)
With the combination of STYLESHEETS and MAIN_LOCAL_STYLESHEET settings, there’s the flexibility to accommodate different degrees of customisation and various Bootstrap workflows. For example, to incorporate CSS from one of the Bootswatch themes, it should be a relatively straightforward matter of downloading the CSS files, placing them in static/css and configuring the STYLESHEETS and MAIN_LOCAL_STYLESHEET settings in pelicanconf.py as appropriate.
Adding Custom Content
Conceptually, Pelican themes are quite simple (although as is often the case, the devil is in the details).
A Pelican theme usually has two directories: static and templates.
The static directory is where any CSS or image files required by the theme will go (along with any other static assets).
The templates directory will usually contain HTML files, which are actually Jinja2 templates.
Pelican requires certain templates that must be present. These in turn can include other templates. To help keep things organised, VoidyBootstrap has all templates included from the core templates in an includes subdirectory.
Like with any other Pelican theme, you are of course free to modify any of the theme’s templates to implement a different layout and add custom content. But if you’re happy to work with the layout the theme provides, and all you want to do is add a few sections of custom content here and there, then VoidyBootstrap provides a potentially easier/neater way to do this.
VoidyBootstrap takes advantage of the Jinja “include” statement with the “ignore missing” option. At strategic points in the theme’s layout, it attempts to include “optional” template fragments (i.e. templates which are used if they are there, but the theme works fine without them, and they are not supplied by default). Therefore it’s possible to add chunks of arbitrary custom content by simply creating these optional template files in the theme’s templates/includes directory.
This is all in an attempt to cater for some common customisation needs. Of course, no one theme can anticipate every design need. So for things like extensive layout changes, modifying the templates is the only option. But I wanted to provide a middle ground — I wanted VoidyBootstrap to provide ways to make simple customisations to content and appearance without having to delve too deep into Pelican’s theme template system.
The diagram below gives an overview of the the templates used to render an article page. The dashed boxes represent these optional templates.
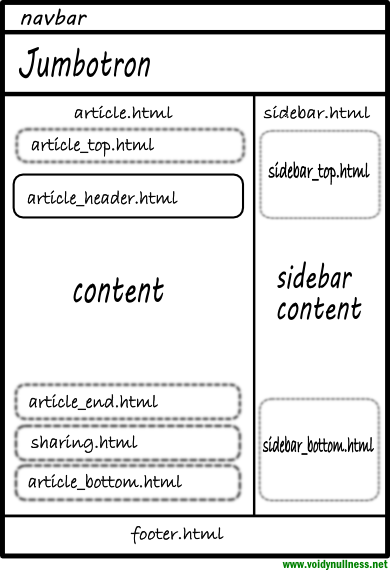
For example, let’s say that at the top of the sidebar of your website you’d like to have an “About” section. You could of course just edit sidebar.html. But adding custom content to the sidebar would be a fairly common requirement when creating a website, so VoidyBootstrap provides some “hooks” to make this a bit easier (not just easier to implement, but also easier to keep your customisations separate from the theme’s templates, for those that might care about that).
Notice in the above diagram that sidebar.html provides two optional templates: sidebar_top.html and sidebar_bottom.html. To have your custom content appear at the top of the sidebar, create a template with the required content in the includes directory called sidebar_top.html. The contents of that template fragment will then appear at the top of the sidebar.
As another example, if you decide you’d like a navigation element at the top of article pages, you could place the HTML for this navigation element in a template called article_top.html. Want to add a copyright message to the footer? Just put it in a template called footer.html and it’ll be automatically included.
See the “Optional Templates” section in the README for a list of all the available optional templates.
Overriding Existing Content
In addition to being able to add new content, the VoidyBootstrap theme also allows some existing sections of content to be swapped out by a custom implementation. It’s an attempt to cater for the case where the theme satisfies most design needs…except for that one thing…
As an example, let’s once again consider what would be a fairly common requirement: customising the sidebar. The default sidebar provided by the theme displays social links (if configured), categories and a tag cloud. The previous section described a way of adding custom sidebar content in addition to what’s there by default. But what if you don’t want categories and a tag cloud in the sidebar? What if you decide that’s completely inappropriate for your website? What if instead you want to have a sidebar full of cat pictures? Well the VoidyBootstrap theme has got you covered. It won’t judge you for what you decide to put in your website’s sidebar, and in fact will gladly facilitate a completely customised sidebar. Simply create your glorious feline sidebar template and put it in the theme’s templates/includes directory (or subdirectory thereof). You can call it whatever you want (as long it doesn’t conflict with anything already there, or the name of an optional template). Let’s say you’ve called the new template cats_sidebar.html, and placed it in a subdirectory called custom. To enable your custom cat pic sidebar, in your pelicanconf.py file add the following line:
CUSTOM_SIDEBAR = "custom/cats_sidebar.html"
This will result in the theme’s implementation of the sidebar being completely replaced with whatever is in cats_sidebar.html. (Goodbye tag cloud, hello kitties!)
VoidyBootstrap provides a number of these “Custom Includes” that allow parts of the theme to be overridden by an alternative implementation. (See the “Custom Includes” section in the README for details.)
As another example, if you think the theme’s article headings are an abomination against all that is good and holy in web design, you’re able to supply your own. Not only that, if you want you can supply different article heading templates for index pages and article pages, thereby allowing for differentiation in layout and style. Simply create templates for custom article headings that please your aesthetic sensibilities, then set the CUSTOM_ARTICLE_HEADER and CUSTOM_ARTICLE_HEADER_INDEX settings appropriately in pelicanconf.py.
Conclusion
There’s more to the VoidyBootstrap theme than what’s been mentioned here. While being a deliberately minimal theme as far as design goes, it aims to be fairly feature complete in every other respect. It’s a modern Pelican blog theme, with hopefully all the features you’d expect in a modern blog theme, and even some surprisingly nice features you might not expect (like custom metadata tags, “featured images”, Open Graph, Twitter Summary Card metadata, and more!).
But it’s main reason for existing are the customisation features discussed in this post. It’s a Pelican theme based on Bootstrap that’s designed to be customised. To that extent, it tries to anticipate and facilitate a range of customisation needs. How appropriate the theme is for your needs will most likely depend on how you feel about usefulness of these customisation abilities. (Or how much you like the default Bootstrap look.)
Comments